Friday, 15 October 2010

Editing our shoot

Today we learnt how to use 'Final Pro Cut' software. It enabled us to edit and re-arrange the shots we had filmed when creating our scene.


All the clips we shot were placed in what is called the 'Rush Bin'. Here we could access all the original takes we first shot.

As a group we watched all the clips and then selected the best shots. We would use these later when putting together our scene. We placed the wanted shots into what is called the 'Log Bin'.

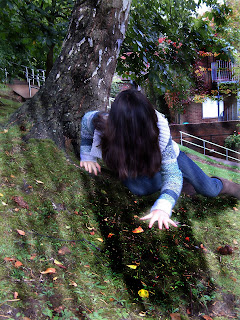
We experimented with the camera shots and angles, and how they could represent our actors in the scene. For example, we felt that we wanted the audience to empathise with our female actor and have our male actor portrayed as menacing.

We conveyed this message subconsciously to our audience by having;
  • Longer close-ups on the girl to encourage an intimacy between her and the audience.
  • By using a high angle shot looking down onto the girl to suggest she has lower status than him - showing her weaker side.
We had not just used longer camera shots on the girl to signify her importance, but we had also thought about the use of lighting and how it could represent the characters in the scene.

To display the boy's threatening attitude, we allowed lots of contrast of both shadow and light on his face to create a mysterious and foreboding atmosphere. Both a mixture of low key lighting and high key lighting was used on his face.

However, to demonstrate the girl's innocence, we used some strong high key lighting which helped enhance her vulnerability. This also portrayed a 'god-like' nature.We become subconsciously aware that the girl must be the protagonist.


Here are some examples of both low key lighting and high key lighting.


Low key lighting


High key lighting

Tuesday, 12 October 2010

Storyboarding

Storyboarding is an essential part of film making. It provides the film makers with basic shot ideas and gives the cameraman an idea of what the producers and directors want. 

A storyboard additionally gives information as to how long each shot lasts, and this will be very important for the editor to know considering he/she will want to create editing through meaning.

Monday, 11 October 2010

Shooting a preliminary task

Now that I understood how to use and set-up the video cameras, I could take on a practical task of shooting a basic scene. I was given a storyboard and had to film the same shots that the board portrayed.

The scene involved two actors.
  • Person A walks into the room.
  • We are then introduced to person B who has been waiting in the room for A.
  • There is some dialogue between the two.
  • Person A then exits and leaves person B in room.


How did we shoot the scene?

My group and I shot the scene in a studio and thought about the use of lighting, props and positioning of camera angles.

We set-up the studio with a desk, which person B sits behind. Person A later leans over the table and speaks dialogue to B - then exits. We also had some realistic props such as a standing lamp in the background and some filing cabinets to demonstrate an office-like room.

My group and I also made sure that we didn't break the 180 degree rule. We made this mistake before when performing a practice run and this made it confusing to watch. I concluded that breaking the 180 degree rule would work better for possibly a thriller or horror scene.
My group and I began with one wide screen shoot all the way through.

We then;
  • Shot over the shoulder of person A.
  • Shot over the shoulder of person B.
  • Shot person A all the way through.
  • Shot person B all the way through.
We couldn't find anyone willing to take part in our preliminary task at first, so instead two of us from the group got involved by both acting and directing. We filmed each of the following above at least more than three times to create our desired shots. Additionally we found that the lighting needed to be fixed as the image looked too dark.

After this we added a few of our own touches such as a big close-up (BCU) on our actors' faces and close-ups (CU's) on significant props which were used in the scene. For example, we did a close-up on a mobile phone. We also used some point-of-view (POV) shots in one character's perspective.
By taking part in this exercise, we learnt that it is best to plan what we are going to do more efficiently before filming as we wasted a lot of time deciding where to place the camera to get some good shots. This task provided good experiance for us all and helped my knowledge develop during the session.

Here is the video of our prelim task.


Monday, 4 October 2010

Analysing a scene from Cloverfield

Today I analysed a scene from Cloverfield and discussed the elements in that scene which would place it under the genre of a thriller/horror. However, I think that Cloverfield comes more under the genre of a science fiction thriller due to the fact that there is evidence of an alien species throughout the film.


cloverfield

Here is the scene which I analysed
http://www.youtube.com/watch?v=T-GKHzRcbAM

Please refer to the video clip before reading the information below.


How do we know the film is set to modern day?

  • The costumes are contemporary and special effects are used to create the image of an alien species. The scene is also set in an underground tube station - another hint into present day. Also we notice the fact that the shot is being filmed by a camcorder in the first place which is new, modern technology.
How is the scene made to look realistic and believable?

  • A cameracorder is used which helps to encourage the audience to believe that the scene is real.
  • The cameracorder sways and shakes as though an actual person is filming it which makes it realistic.
  • The cameracorder has been given certain 'functions' on it such as 'night vision' etc.
What techniques are used to create a thrilling atmosphere?

  • Majority of the clip is filmed in dark surroundings.
  • The camera sways and shakes - creates a realistic vision and helps enhance the panic when the characters run from the alien species.
  • Lots of shadow is used.
  • Camera breaks the 180 degree rule so that we feel un-easy and un-settled. 
  • Camera goes in and out of focus at points so that we can't see much.
  • We view some of the action from the ground upwards to enhance the fact that the humans here have very little power. It also makes the audience feel as though they are in the same position.
  • The scene is filmed in one long shot. There are no breaks to cut the tension.

Wednesday, 29 September 2010

How to use the video cameras

Today I learnt how to use all the different features and effects on a video camera. I was also taught how to set up and use a tripod.

There are three main features on a typical video camera.


  • Zoom
  • Focus
  • Exposure

Zoom - Enables us to magnify a certain image through 'zooming'.

Focus - Helps us to see the image more clearly once we have zoomed in. It prevents a blurred shot.

Exposure - Allows us to control the quantity of light reaching the film.


On the screen of the video camera, you will be given information such as battery life and the exposure setting. The higher the exposure setting, the less light you are letting through. You are also told how many minutes are left on your memory stick and given a time code.


How to read a timecode

The timecode is found on the top right of the screen. It may read something similar to this

01:03:52:24


01: One hour

03: three minutes

52: fifty-two seconds

24: Twenty-four framed shots per second


Through the timecode, we can establish the fact that we have recorded for one hour, three minutes, fifty-two seconds and we are currently on our twenty-fourth frame.

The video camera will take at least twenty-five shots per second. It is important that we know how many shots per second we are dealing with so as to be precise when editing our film.


White balance (Wht Bal)

This is the process of removing unrealistic color casts, so that objects which appear white in person are rendered white in your photo. The video camera has to take into account the "color temperature" of a light source, which refers to the warmth or coolness of white light. 

Here are, for example, two pictures which portray different 'temperatures' and demonstrate the importance of white balance.


Incorrect White Balance - Cool  

Correct White Balance - Warm


To fix the white balance we need to aim the video camera at a blank white wall so that it will then be able to pick up all the colors from the spectrum.


Signs and Symbols

STBY - Standby

REC - Record

Wht Bal - White Balance

F2.2 - An exposure of 2.2 (F5 - an exposure of five)


Dialogue before action

Before recording a piece of action it is important that we have set up the equipment correctly and that the director and crew are prepared. The actors also need to feel that they are in good hands and working with a professional crew.

Typical dialogue before recording could be

Director  'Standby'  

Crew 'Standing by'

Director 'Roll the camera'

Crew 'Rolling'

Director 'Action'


Tuesday, 28 September 2010

Creating and editing posters

Hey there,

In today's lesson our task was to create a film poster. We were given a camera and told to take pictures on campus. We had to think a lot about Mise En Scene and how to create the desired effect we wanted on our audience.  

My partner and I decided to make a poster for the 'horror' genre of film. We tested different locations to see what was suitable for this theme and experimented a lot with camera angles. We also thought a lot about body language and what impression this might give the audience.

Considering we wanted a horror/thriller approach for our poster, we thought that it would be best to have a tilted camera shot to create an un-easy feeling. However we couldn't find a good angle to work with, so instead took a picture on a hill that was slanted - which still gave an unsettled perception. Also notice that my head and hair are the centre pull of focus. This is where we used the idea of 'The Rule of Thirds'.

Here you can see the original image and the edited version of the picture we took. We edited the second picture using Photoshop software. I covered my hair over my face to create a mysterious and uncanny look. I also thought a lot about my physicality and
                                            what kind of posture I should adopt.


I decided to use lots of shadow whilst editing our poster. To create this shadow illusion I used the 'burn tool' on photoshop to add in shaded areas. I felt that this really helped to enhance the dark nature we were trying to portray. I also used the 'sponge tool' to give the impression of some natural light coming through. I thought that the light streaks I added would create a more naturalistic approach.


Friday, 24 September 2010

Sounds and Signs

Learnt a lot of new vocabularly today which I must share!
There are specific names for different media signs.

Sign: This is an image, object or action that carries meaning or significance.

Denotation: Discussing the image we are observing. What do we see at first?

Connotation: This involves analysing the image in more detail. What do the elements signify that we see? For example, does a character wearing a red t-shirt symbolise an angry nature?

Semiotics is the study of signs and symbols.

Please refer to the attached picture of the dog.

  • The signifier is the dog.
  • The signified (implied) is the cute expression on the dog's face.
  • The overall sign is that it is a cute dog.


Today i've also learnt a bit about sound techniques.

Diegetic Sounds - They are realistc sounds heard in the scene (eg; a telephone ringing)

Non-diegetic Sounds - This is background music that actors cannot hear, only the audience. It's purpose is to enhance the atmosphere of the particular moment in a scene for the viewers.

Panning Sounds - This is when we hear a sound that travels through the left speaker to the right, or right to the left. It can make viewers feel uncomfortable and works particularly well in horror movies.

Watch this Jaws clip off youtube which uses both diegetic and non-diegetic sounds.
http://www.youtube.com/watch?v=UcjjB0OOu9Y&feature=related

At first we hear a typical beach ambience and the sounds of the waves, and also later a radio. These are all diegetic sounds.

Then at 3:07 we hear a non-diegetic sound of strings building up to create tension and fear.

First lesson on Media!

Today i've been learning how to use Photoshop software. We learnt a lot about the basic tools on it and how to use them within pictures and posters to create effect. For example, we experimented a lot with the 'Lasoo Tool' and the 'Burn Tool'.

I also discovered how to edit and switch characters' heads from the posters. Some of the results were very funny and I was glad to be learning in a fun, productive way. I, in addition, came across a colour enhancing feature which was very effective for some of the posters I edited. In one I enhanced the colour of a character's blue eyes, and it really added to the eerie image the poster was already portraying.

I was later taught the term 'Mise En Scene'. This phrase literally means 'setting a scene' and is the French for 'everything in frame'. A photograph will portray an image to an audience member, and instinctively they will receive information about the style, genre and location of the scene.

'The Rule of Thirds' is a particularly important feature of Mise En Scene. It consists of two, invisible horizontal and vertical lines crossing one another across the image. This is very similar to that of a noughts and crosses game board. It is common that the main focus should be placed at the very centre of the image, however, to create different effects the image can be moved to either side of the frame. Furthermore, I experimented with this too.

Introduction to myself

Hey there!

Just a quick introduction to me! My name is Sophia and I attend Hurtwood House sixth form college. I like socialising, singing and laughing at random things. I also enjoy watching thriller/suspense films - and a little comedy to lighten my day.

I found that Hurtwood taught Media Studies in an interesting, informal way and, due to the fact i'd always wanted to learn more about the media in today's society, I chose to take Media as an A Level subject. I thought it would be a good option considering I showed some enthusiasim and interest into this area before starting the course.

So considering i've only just begun the whole process, i'm beginning to learn new things! My next blog will include the first few techniques i've learnt within the Media industry.

Till then!